Knots are usually tied to join two ropes, a rope with itself or a rope with another structure like a pole. Tying knots correctly is a useful skill to have, not just for specific purposes but for everyday life as well. As we will see, sometimes simple knots may be combined to make more complex knots which makes it easier to learn and remember those knots.
When a rope is tied with itself it's called a knot, when a rope is tied with another rope it's called a bend and when a rope is tied with another structure like a pole it's called a hitch. Here we will discuss 5 knots, 5 hitches, 3 bends and 2 surgical knots, making a total of 15 knots that are easy to tie and useful in everyday life.
Parts of a knot

Courtesy: Wikipedia (CC BY-SA 3.0)
List of knots
Knots
A knot is used when a rope is tied with itself. We will discuss 5 basic knots.
Overhand Knot
An overhand knot is one of the simplest knots.
Steps to tie:
- Make a loop with the rope.
- Pull the working end through the loop.
An overhand knot can be used as a stopper knot. It can be used to prevent the ends of a rope from unravelling. It is also used as a component of some other knots. If a overhand knot is tied around a pole, it becomes a half hitch.
Reef knot
A reef knot (aka square knot) is essentially two overhand knots in succession.
Steps to tie:
- Make a left handed overhand knot (left over right).
- Now make a right handed overhand knot over the previous one. (right over left).

The two knots are to be made opposite to each other. If they are made the same (both left handed or both right handed) a granny knot is produced, which is not very secure and unties easily.
The reef knot is used to secure a rope around an object. It should not be used to tie two ropes together as it's insecure as a bend.
If both ends of a reef knot is slipped, i.e passing a loop instead of the working end for the ease of untying, it's called a shoelace knot
Butterfly loop
Butterfly loop (aka alpine butterfly or lineman's rider) is a knot used to make a stable loop in the middle of the rope.
Steps to tie:
- Make a loop in the middle of the rope
- Twist the loop to make two loops on both sides of the twist, one towards the rope (lower) and the other away (upper) from it.
- Pull the upper loop down without disturbing the lower loop.
- Pull the upper loop through the lower loop and tighten it.

This knot makes a stable loop in the middle of the rope which can used as an anchor point to attach other devices such as hooks. The loop portion of the rope is spared from the weight bearing, so it can be used to isolate a weak or worn out part of a rope.
Figure of eight
A figure of eight knot is used as a stopper knot.
Steps to tie:
- Make a loop on the working end of the rope.
- Wrap the working end around the standing part of the rope.
- Pull the working end through the first loop and tighten the knot.

A figure of eight knot can be used as a stopper knot like the overhand knot, but it is preferable because if jammed, the figure of eight knot is easier to undo.
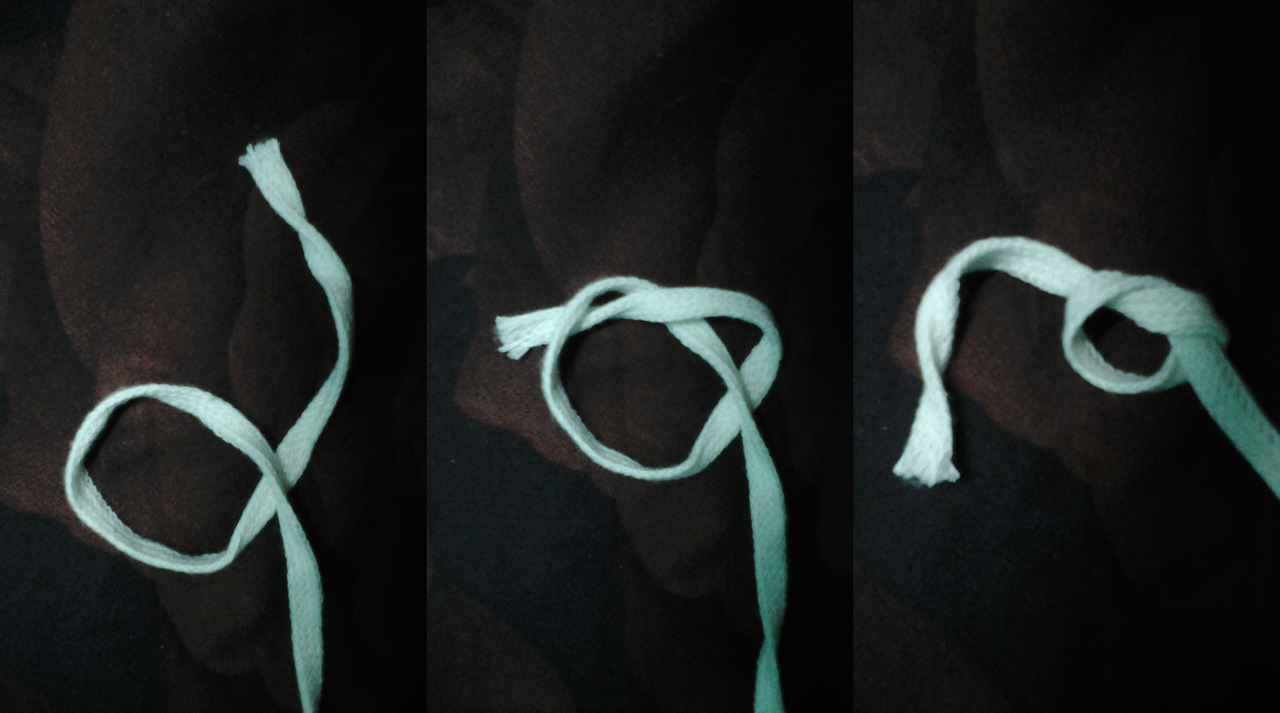
Bow line
Bow line is used to make a fixed loop at the end of a rope.
Steps to tie:
- Make a loop near the end of the rope (rabbit hole).
- Pull the working end through the loop (rabbit comes up the hole).
- Wrap the working end around the standing part of the rope (rabbit runs around the tree).
- Pull the working end through the first loop (rabbit hops back into its hole).
A bow line is a very useful knot. The loop can be used to attach other devices. The loop can also be passed through an opening or around some other structures which secures the rope to it.
Hitches
A hitch is used to tie a rope with another structure like a pole. We will discuss 5 basic hitches.
Half hitch
A half hitch essentially a overhand knot tied around an object.
Steps to tie:
- Wrap the working end of the rope around the pole making a loop around it.
- Wrap the working end around the standing part of the rope.
- Pull the working end of the rope through the first loop and tighten the hitch.
A half hitch is one of the most basic hitches. It is insecure on its own but it is an important component for many other hitches.
Clove hitch
A clove hitch can be described as a combination of two half-hitches.
Steps to tie:
- Wrap the working end of the rope around the pole.
- Cross the working end over the standing part of the rope.
- Wrap the working end of the rope a second time around the pole in the same direction as the first one.
- Pull the working end through the gap between the two turns.

The clove hitch is used to tie a rope around a pole or some other object securely. The hitch is also easily adjustable.
Rolling hitch
A rolling hitch is a type of friction hitch that resists longitudinal pull towards a particular direction. A rolling hitch is essentially a clove hitch with two initial turns towards the direction of the pull.
Steps to tie:
- Wrap the working end of the rope around the pole so that the working end stays towards the direction of the pull.
- Wrap the working end of the rope a second time towards the same direction.
- Cross the working end over to the other side across the standing part of the rope.
- Make a half hitch with the working end of the rope around the pole.

A rolling hitch is used to tie a rope around a pole or another rope when a longitudinal pull is expected. Care must be taken that the two initial turns stays towards the direction of the pull. The hitch must also be tightened carefully before use. A rolling hitch can be adjusted by holding the knot firmly in hand and sliding it across the pole.
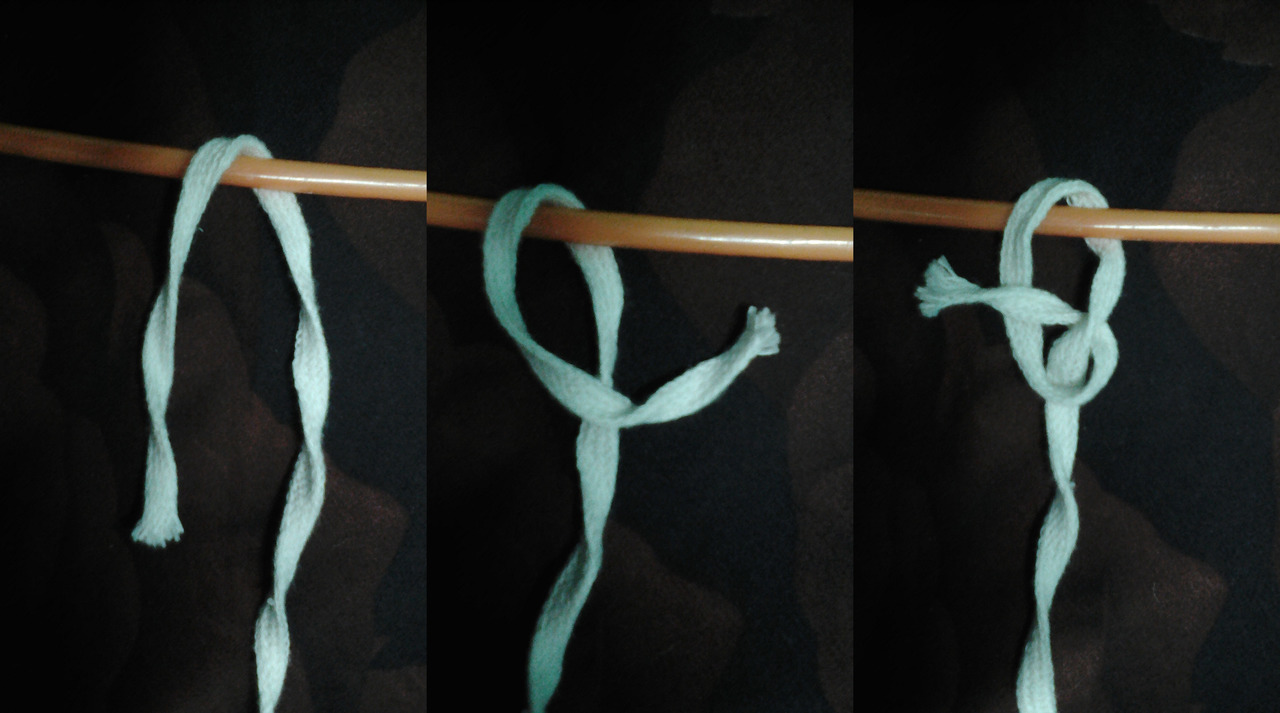
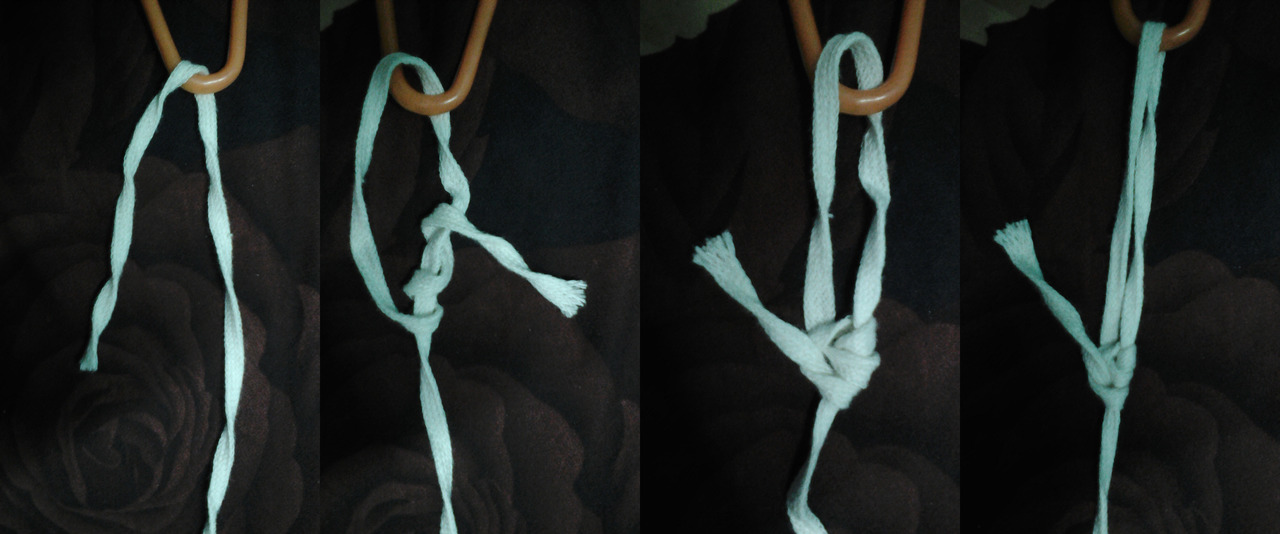
Buntline hitch
A buntline hitch is used to tie a rope to an object such as a ring or a pole.
Steps to tie:
- Wrap the working end of the rope around the ring.
- Make a clove hitch around the standing part of the rope, so that the second loop is towards the ring (inside), not away from it.

Buntline hitch is more secure than clove hitch while attaching a rope to an object such as a ring or a pole, but it jams more easily under pressure. To prevent jamming a slipped version of this knot can be tied by passing a loop rather than the working end during the last passage.
Taut-line hitch
A taut-line hitch is used to tie a rope to an object such as a ring or a pole when periodic readjustment is necessary to keep the rope taut.
Steps to tie:
- Wrap the working end of the rope around the ring.
- Make a rolling hitch around the standing part of the rope, so that the two initial loops are towards the ring (inside), not away from it.
Taut-line hitch can be easily adjusted by holding the knot firmly in hand and sliding it across the standing part of the rope.
Bends
Bends are used to join two ropes together. We will discuss 3 basic bends.
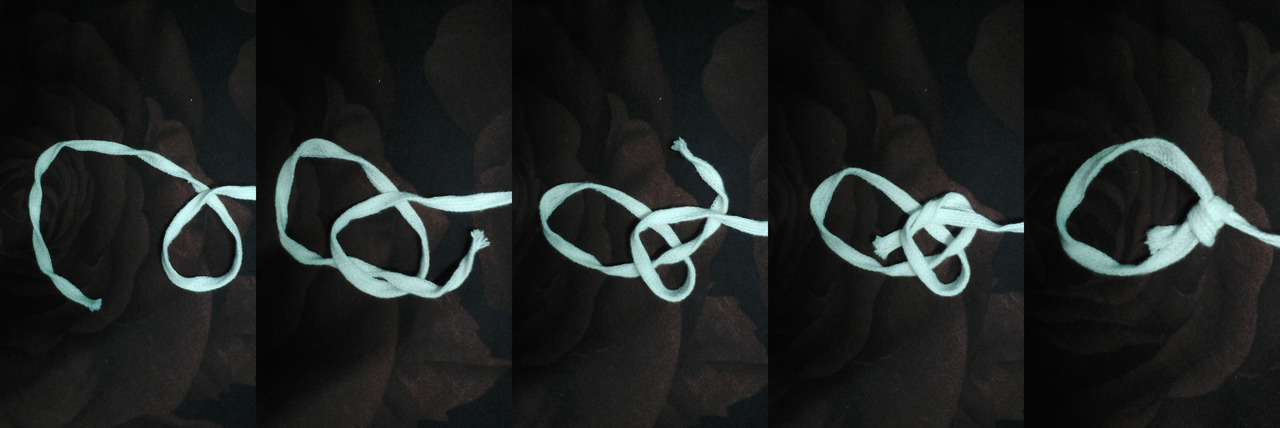
Sheet bend
Sheet bend (aka weaver's hitch) is useful to tie two ropes together, even when they are of different thickness.
Steps to tie:
- Make a loop with the first rope.
- Pass the working end of the second rope through the loop.
- Wrap the working end of the second rope around both strands of the first rope.
- Pass the working end of the second rope between the first loop and the second rope.

Sheet bend should be tied in such a fashion that working ends of both the ropes end up on the same side. Otherwise the knot will be insecure.
Sheet bend can be used to tie two ropes of same or different thickness together. It is much more secure than tying two ropes together with a reef knot which is sometimes used mistakenly.
Sheet bend can also be tied easily with thin threads and is used widely in weaving.
Fisherman's knot
Fisherman's knot is a misnomer, it is actually a bend (Fisherman's bend is a different knot which is actually a hitch).
Steps to tie:
- Make an overhand knot with the first rope around the second rope.
- Make an overhand knot with the second rope around the first rope.
- Tighten the bend by pulling standing ends of both ropes.

Fisherman's bend can be easily tied even with cold and wet hands hence it's suitable for fishing. This knot has the tendency to jam easily.
Double fisherman's knot can be tied by tying two overhand knots over each rope instead of one. It provides improved security.
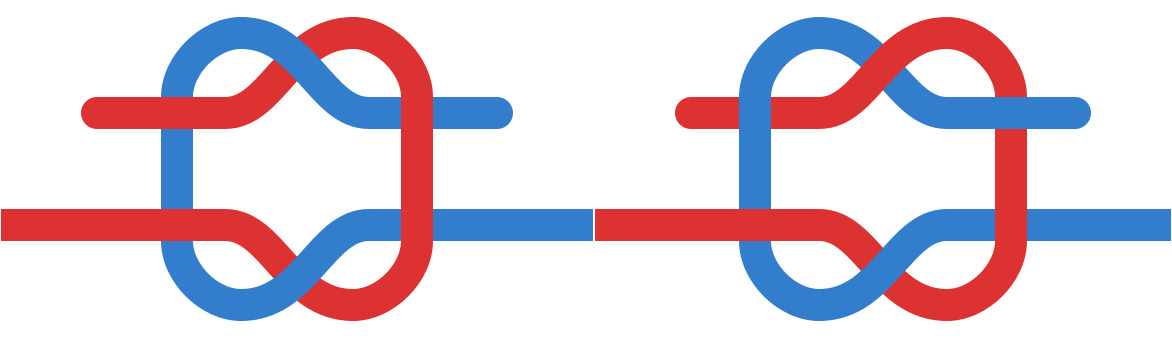
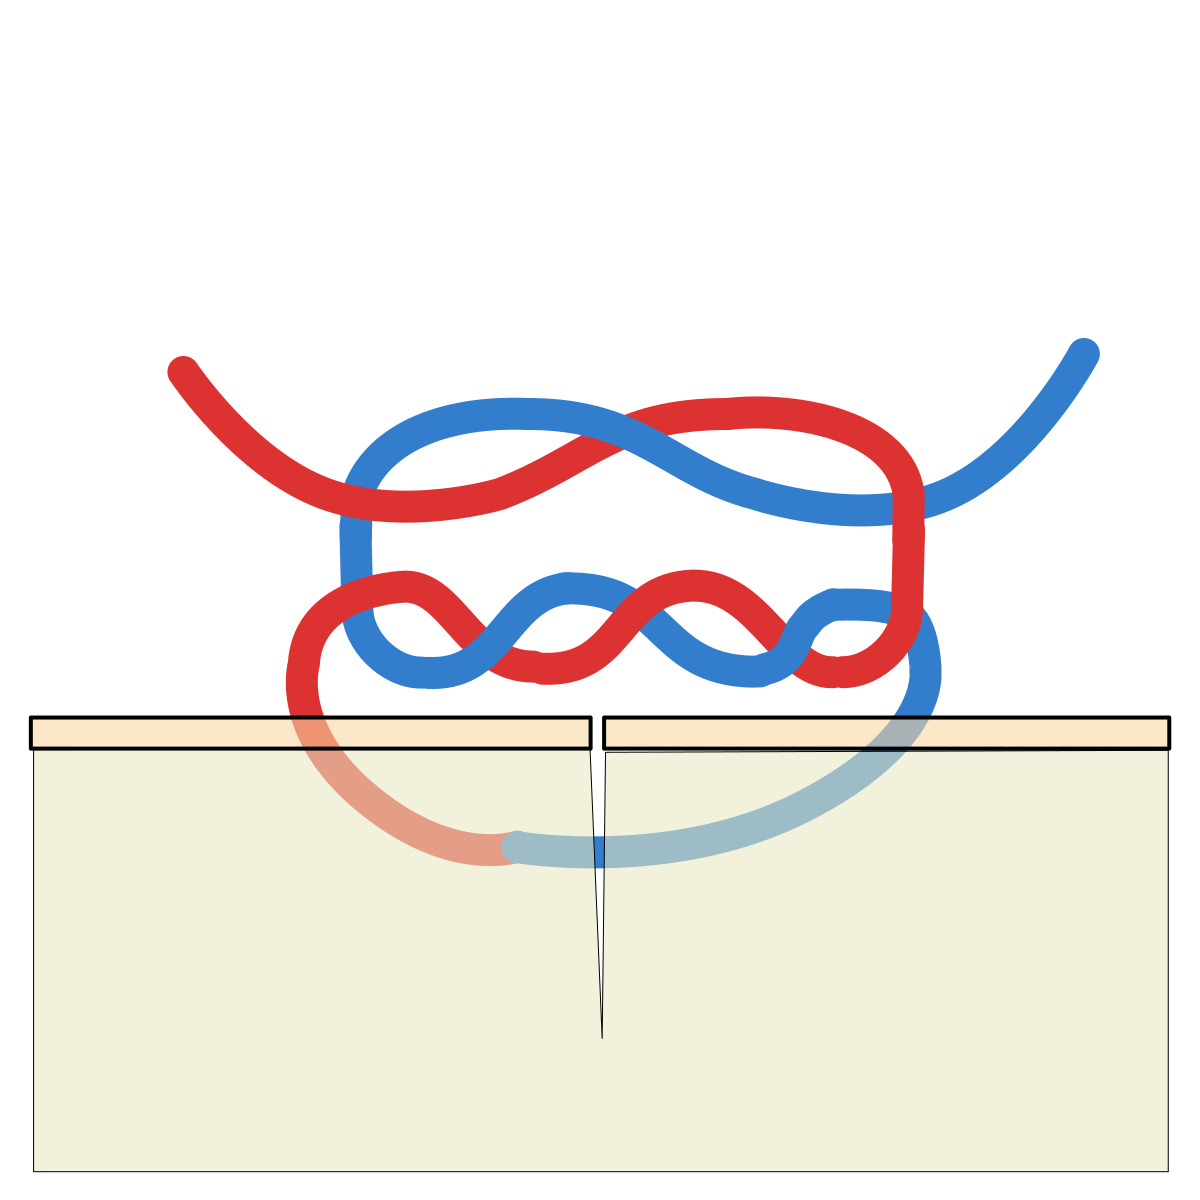
Butterfly bend
Butterfly bend is essentially a butterfly loop with the loop cut open.
Steps to tie:
- Make a loop on each rope and interlock them.
- Cross the each rope's working end over their standing part.
- Pull both working ends through the interlocking between two loops.

The butterfly bend can also be tied by holding the working ends of both ropes together and tying a butterfly loop in the middle.
Surgical knots
These 2 knots are used in the practice of surgery to tie suture materials.
Surgeon's knot
Surgeon's knot is a modified reef knot with an additional twist while tying the first overhand knot.
Steps to tie:
- Make two loops with the rope.
- Pull the working end through the loop.
- Tighten the knot and make a second overhand knot in the opposite direction.

Surgeon's knot is commonly used in wound closure e.g. simple suture. It's important to make the two halves of the knot in opposite direction, otherwise an insecure knot (similar to granny's knot) will be produced. Often a third overhand knot is often added in addition to the two, it further increases the security.
Aberdeen knot
Aberdeen knot is a better alternative to reef knot when tying off the suture material at the end of a continuous suture.
Steps to tie:
- The last loop of the continuous suture is not tightened.
- A loop is made in the free end of the suture material and this loop is passed through the previous loop.
- The previous loop is tightened around the second loop.
- A new loop is made in the suture material and passed through the second loop which is tightened around the new loop.
- This process is repeated 4 - 6 times and the remaining free end is cut.
Aberdeen knot produces only one cut end in contrast to a reef knot which produces three cut ends. It is also easier and faster and more secure according to some recent studies.
Conclusion
Learning how to tie a knot takes patience and practice. It's recommended to learn the most basic knots very well, that'll make it easier to learn more complex knots.
A knot can be tied by multiple methods. I have discussed the methods I found to be the easiest. But every one has their preferences, moreover different methods are suitable for different scenarios.
For people interested in learning more about knots, The Ashley Book of Knots is an excellent resource.
 RSS Feed
Write a comment: